
Setting Up a Honeypot with Cowrie
Setting Up a Honeypot with Cowrie
Honeypots: A Deep Dive into Cybersecurity Deception
In the ever-evolving world of cybersecurity, protecting systems and networks is a continuous challenge. One of the most intriguing techniques in the cybersecurity arsenal is the honeypot. Honeypots are designed to deceive attackers by simulating vulnerabilities and weaknesses, offering a controlled environment where their actions can be observed, analyzed, and learned from. In this article, we'll explore the concept of honeypots, their types, how they work, and how tools like Cowrie help in creating these deceptive environments.
What is a Honeypot?
A honeypot is a cybersecurity resource or system set up to mimic a vulnerable target for attackers. The primary purpose of a honeypot is to attract malicious activity by presenting a seemingly easy target. Once an attacker interacts with the honeypot, their actions can be monitored, analyzed, and used to enhance the security of real systems.
How Do Honeypots Work?
Honeypots work by simulating services and systems that appear vulnerable to attackers. These systems may include:
- SSH Servers: Open SSH ports with weak or no authentication.
- Web Servers: Fake websites with common security flaws.
- FTP Servers: Servers designed to attract brute-force attacks.
When an attacker attempts to exploit these fake systems, the honeypot records their activities, including commands executed, files accessed, and tools used. The data collected is invaluable for understanding attack methods and improving defensive measures.
Cowrie: A High-Interaction Honeypot
Cowrie is one of the most popular high-interaction honeypots, primarily used to capture SSH and Telnet brute-force attacks. It simulates a vulnerable Linux machine and logs all attacker activity, including command execution and file downloads. Cowrie is designed to be realistic and interactive, making it a powerful tool for studying attackers.
Key Features of Cowrie:
- SSH and Telnet Simulation: Cowrie mimics real SSH and Telnet services to capture brute-force login attempts.
- Command Logging: All commands executed by attackers are logged for analysis.
- File System Interaction: Attackers can interact with the file system, download files, and attempt exploits.
- Real-Time Monitoring: Logs are available in real-time, allowing for immediate analysis.
Setting Up Cowrie: A Step-by-Step Guide
If you're interested in setting up Cowrie to catch attackers in action, here's a quick guide to get started.
What You'll Need
- A Linux-based system (e.g., Ubuntu or Debian).
- Python 3.x installed.
- Basic knowledge of Linux terminal commands.
Warning: Never expose your honeypot on your production network. Use isolated or virtual environments.
Step 1: Setting Up the Environment
First, ensure your system is up-to-date. Run the following commands:
sudo apt update && sudo apt upgrade -y
sudo apt install git python3 python3-venv -y
Change the Port You'll Use to Administer the Server: Cowrie will be listening for SSH connections on port 22. You'll want to configure the SSH service to listen on a different port for you to connect to and administer the server.
sudo vi /etc/ssh/sshd_config
Now change the port to a desired number Eg2222
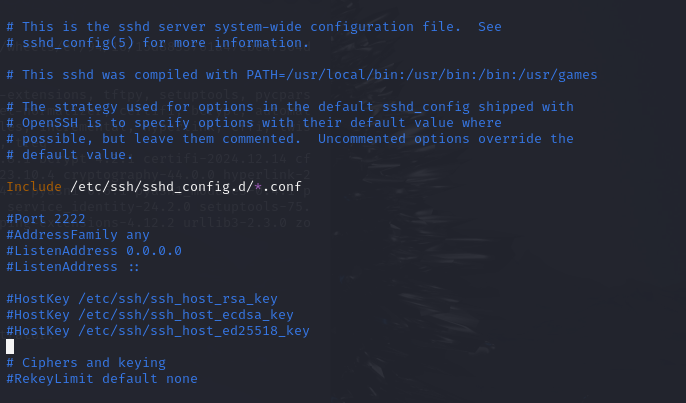
The restart the ssh service to apply changes
systemctl restart ssh

Then run this command to verify that we are listening on the port we set

netstat -tan
if successful the output should look like this

Step 2: Installing Dependencies
Now we have to install all the dependencies of Cowrie :
sudo apt-get install git python-virtualenv libssl-dev build-essential libpython-dev python2.7-minimal authbind
Then we have to add a new user cowrie :
sudo adduser --disabled-password cowrie
**If successful, the output should be like :
Adding user `cowrie' ...
Adding new group `cowrie' (1000) ...
Adding new user `cowrie' (1000) with group `cowrie' ...
Creating home directory `/home/cowrie' ...
Copying files from `/etc/skel' ...
Changing the user information for cowrie
Enter the new value, or press ENTER for the default
        Full Name []:
        Room Number []:
        Work Phone []:
        Home Phone []:
        Other []:
Is the information correct? [Y/n] Y
You can leave Full Name, etc.. blank.
Now lets run as cowrie :
su -cowrie
Step 3: Cloning cowrie code and Creating a Virtual Environment
Navigate to the home directory of user, cowrie, and clone the cowrie git repository.
git clone https://github.com/micheloosterhof/cowrie.git
cd cowrie
Set up a Python virtual environment to keep dependencies isolated:
virtualenv cowrie-env
Then activate the virtual environment
source cowrie-env/bin/activate
Then we need to install the packages of Python that Cowrie needs to run :
pip install --upgrade pip
pip install -r requirements.txt
Step 4: Configuring Cowrie
Copy the default configuration file and edit it:
cp etc/cowrie.cfg.dist etc/cowrie.cfg
nano etc/cowrie.cfg
After that, we will edit this file by changing the hostname first as this will make the attacker think that it is in our server without us knowing :
Key Configuration Options:
- Change the Hostname (In this example I renamed it to
myserver1)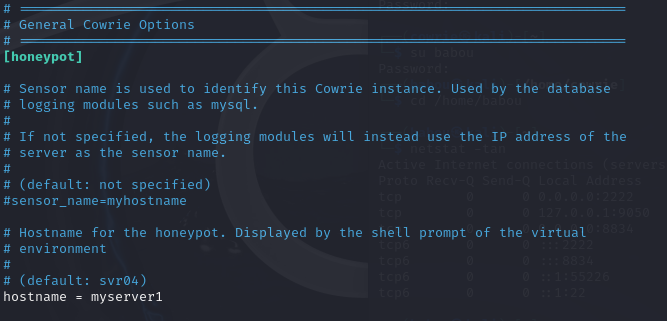
- Enable Telnet if required (Which is required in my case).
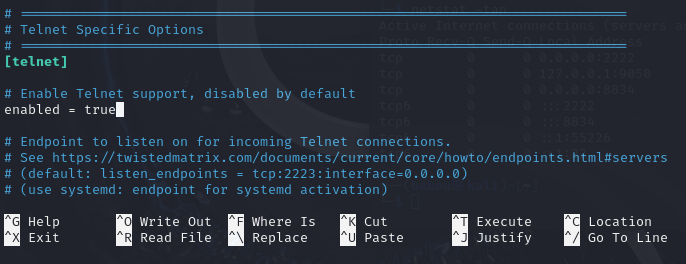
In this file (cowrie.cfg) there are many options to play with, from logging and alerting to fake address and file downloads.
Step 5: Starting Cowrie
Start the honeypot using the following command:
bin/cowrie start
NOTICE : In my case I simulated the attack locally but the process would be pretty much the same in a real world scenario
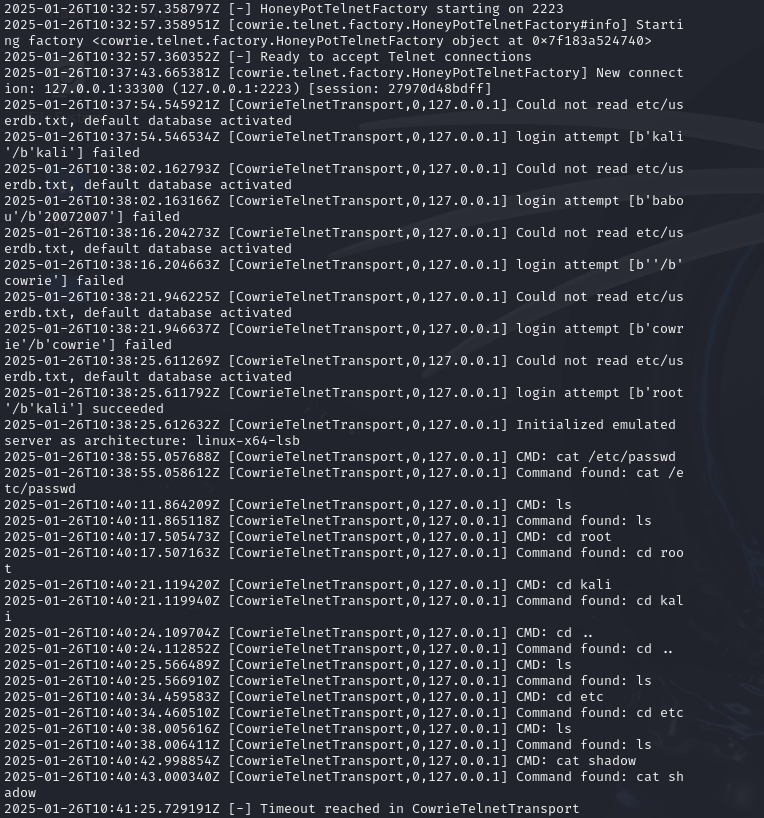
So, remember when we enabled telnet, it's gonna come in handy now. I connected to telnet using the port and executed some typical commands that an attacker would try out:
telnet 127.0.0.1 2223
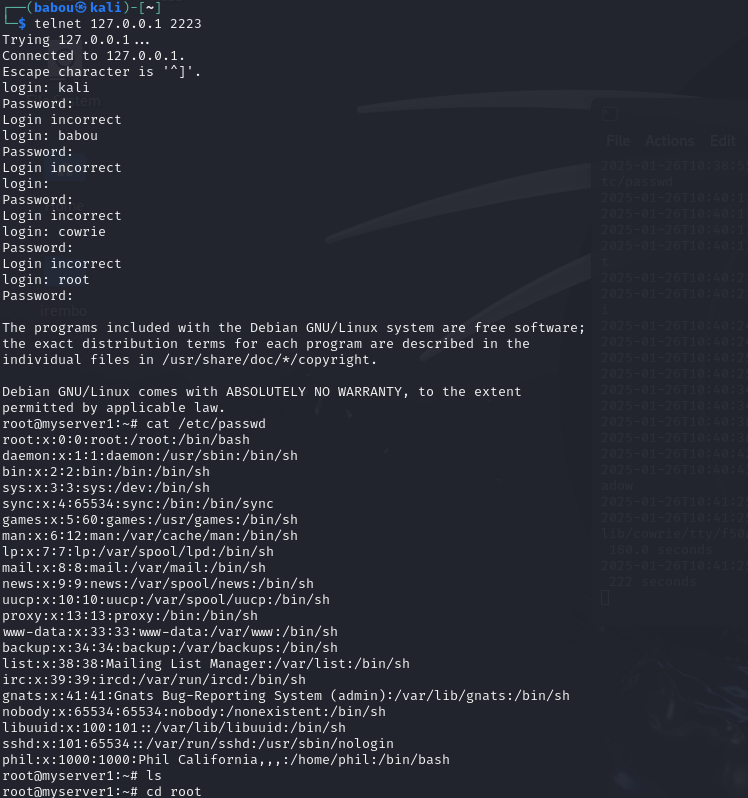
and as I was doing this, everything was being logged in the cowrie.log file in real timeeee. When I run this command i could see everything I was doing on the other side, Pretty cool, right !
tail -f var/log/cowrie/cowrie.log
###Extra Notes
Cowrie stores logs and session data in the var directory. Key files include:
- auth.log: Records authentication attempts.
- tty.log: Captures session activity.
To view a session recording:
bin/playlog var/lib/cowrie/tty/<session_file>
Visualization
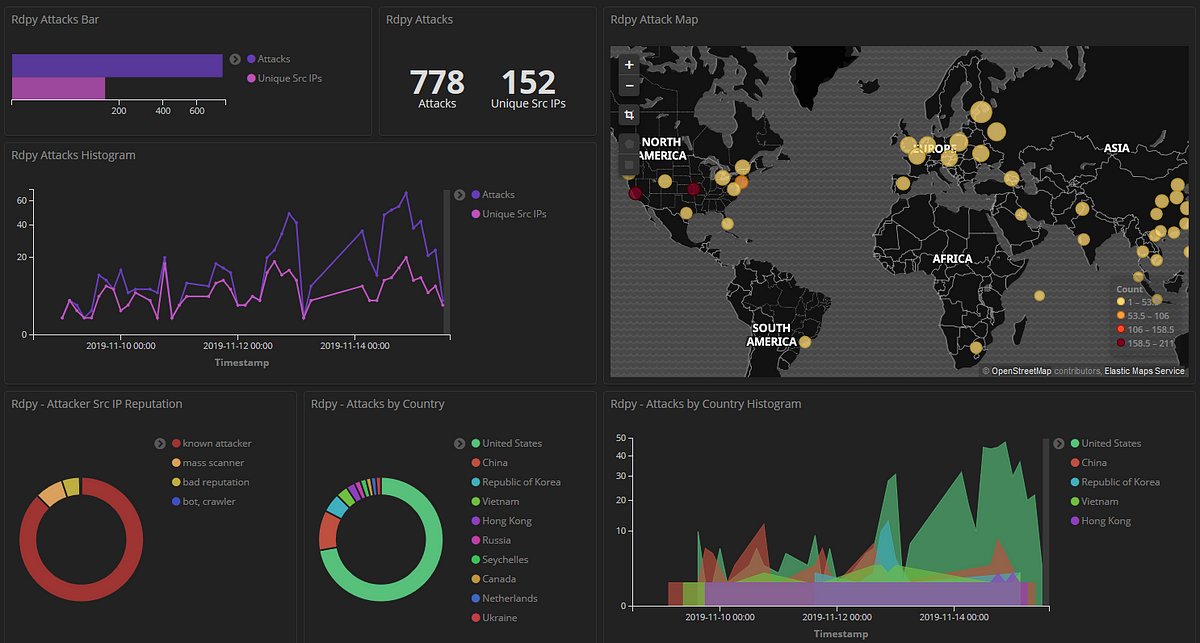
You can use tools like ELK Stack (Elasticsearch, Logstash, Kibana) to analyze and visualize the captured data.
Example:
Install Elasticsearch and Kibana, then ingest Cowrie logs into Elasticsearch. Visualize attack trends using Kibana dashboards.
Note: Honeypots are for research and educational purposes. Ensure compliance with legal and ethical guidelines.
Conclusion
By setting up Cowrie, you've created a powerful tool to observe and analyze attacker behavior. Experiment with different configurations and explore advanced visualization tools to gain deeper insights into cyber threats.
Thanks for reading 💖
Comments(0)
Add to the discussion with mindful and relevant comments
No comments yet. Be the first to start the conversation!